Name
The name is a backronym really – ‘mFC’ sounded cool and figured it could mean Madox F@$@!%-up Contraption…or Madox Floating Camera.
Background / History
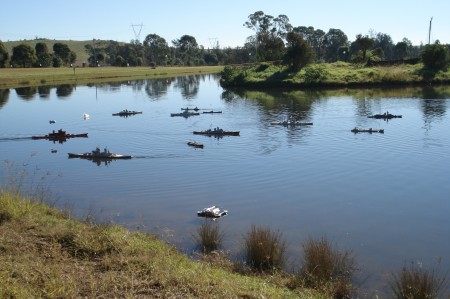
A work colleague who builds and competes with 1/144 scale model warships in the Australian Battle Group invited me to spectate at one of their nationals. Not having the patience to build a model ship, but not wanting to just turn up there empty handed twiddling my thumbs watching people play I figured maybe I can get something into the water too.
The idea was for a tele-operated floating camera that will film the model warships as they shoot each another to smithereens… only problem was the lack of time with the event looming in less than a month and work/personal commitments.
I usually design custom circuits/PCBs for my projects (one reason why some seem to stall for eternity). This time I figured I’ll learn from all my casual reading of Hack-A-Day and use commercial off the shelf products for this thing!
COTS Components
- Asus WL-520GU Wireless Router
- Denkovi USB 8 Channel Relay Board
- AV-Tech AVI202 IP Camera(aka TP Link TL-SC3000?)
- Johnson L450 Cartridge Bilge Pump
- 12V 7Ah SLA Battery
- 6V 3.2Ah SLA Battery 6AA NiMH Batteries
- $8AUD Waterproof Case from the discount store

- 2 × Stationary Trays
- Cable Ties
- Wire
- Foam Blocks
- Terminal Strips
- Duct Tape
Concept of Execution
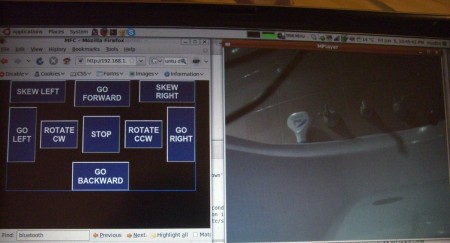
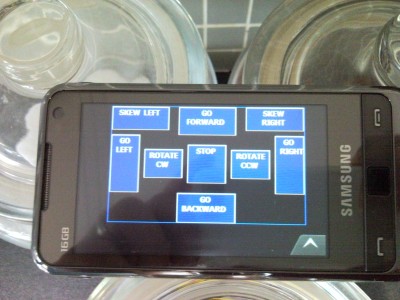
The WL-520GU will host an interface webpage to allow remote control via a laptop/portable device connected via WiFi. A CGI script will feed commands received via the web interface onto the relay board to control the thruster pumps.
The laptop/portable device will also be recording the live MPEG4 stream from the IP Camera from the WiFi.
Build
Build was a bit rushed, it was the 4th June… the AusBG event was only 2 days away and I haven’t really started. Lucky it was all intended to be MacGyver’ed together anyway so 2 days should be plenty.
Too lazy to document properly the MacGyver Floating Cam (Name change?) so here’s an abbreviated process (warning : might not be in any sensible order since there was really almost no thought put into the process) :-
- Buy the stuff…yup…
- Compile/Install OpenWRT with libusb & libftdi onto the router.
- Confirm the relay board works with the router by manually running commands.
- Prepare a simple SSH script and Web GUI interface to drive the relay board.
- Beg someone (Richard K) to drill some holes in the lid of the waterproof case for me.
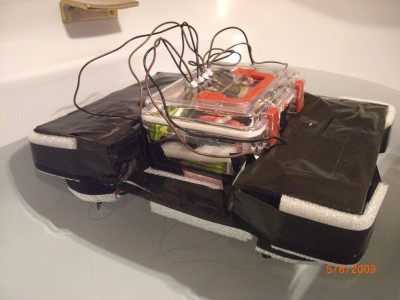
- Each of the bilge pumps were ‘roughly’ aligned and cable tied to the stationary trays.
- Foam blocks were cut to fit the stationary trays
- Pass through the pump wires through the lid of the water proof case.
- Cut some wire and strip the ends, wire up the contraption using screw terminals and the Wago terminal strips. WTF I have a wiring diagram here…6V SLA is now 6AA NiMH batteries.
- Duct tape, lots of duct tape. Painfully attach the stationary tray with bilge pumps by oneself to the waterproof case… use duct tape…lots of duct tape…even more duct tape…and more duct tape…such that the whole thing turns ‘black’ 🙂
- Try pack everything into the case…and pray that it fits…(it didn’t look like it would at first)…try harder….bend the wires…try harder…it’ll fit…IT FITS.
- Put in water for some testing
Software
Rush build and just simple laziness means I didn’t bother much in terms of software and I probably suffered for it.
In writing this…in hindsight I’m too embarassed to show it 🙂 I’ll post it if anyone asks…but maybe just some photos for now…


Tests
I didn’t want this thing to fail spectacularly in front of so many people so its almost compulsory I do some tests…
Bath tub test 1 – http://www.madox.net/blog/2009/05/24/mfc-madox-floating-camera-part-1/
Bath tub test 2 – http://www.madox.net/blog/2009/06/05/mfc-madox-floating-camera-part-2/
Moment(s) of truth
- Moment 1 – Yay it floats
- Moment 2 – Crap it’s not balanced…forward lisps to the right…right lisps backwards….left lisps (forgot)… but backwards works!
- Moment 3 – Well at least the connection and the camera works…lets start recording…
- Works well enough on my laptop
- Works not so good on my friend’s laptop, drops connection every time i kneel down (the laptop is heavy)
- Works horribly on a WinMo phone…can’t seem to press the buttons on Opera and IE just looks horrible.
- Moment 4 – Argh the videos came out horribly 😛

Sample video :-
More videos here :- http://www.madox.net/blog/2009/06/06/australian-battle-group-national-battle-meet-6-june-2009/
Afterthoughts
- The model warships are maneouverable enough to avoid the camera, don’t worry so much about getting in the way.
- Need way more speed to catch up to the action.
- Need speed control for better maneouverability, hard on/off motor control = near impossible to control.
- Need a streamlined hull(s). Moving a square block in water = neart impossible to control.
- Need a better control method… bought some playstation controllers for anything in the future 🙂
- Need a new laptop battery… 😛
Edit :- As requested by some people…


http://www.youtube.com/watch?v=VEKRbwAUf10
Video Of my camera mounted on a warship
http://www.youtube.com/watch?v=dmwottc1ndo&NR=1
Video of the battle, sound helps much
Some Video I shot with a Go-Pro-Hero Wide angle camera (170 degree)
is meant for remote control car racing, but waterproof to 200 feet. (60+ Meters)
so would work well for your mFC mark 2, all you need it a floating platform then
(Might I throw out the idea of a foam surf board, can build a little tripod and it
will be stable, light, and with some inexpensive motors and a few rudders quite
maneuverable. just my 2 cents
PS Here is what camera looks like out of housing:
[IMG]http://i171.photobucket.com/albums/u307/the_mariner_photos/Hobbies/HEROGoProLR.jpg[/IMG]
Bryan
Nice video 🙂 Unfortunately I haven’t built any ships yet. This really was only an exercise to see if I can get a contraption up with ready off the shelf items and into the water with minimal effort… actually it was an excuse to play with that router 🙂
Hi Madox!
Please help me! I found on your webpage to install libFTDI to OpenWrt. Can you help me how can i do that?
Thank you very much
Zsuzsi from Hungary
You don’t actually need to ‘install’ libftdi onto your router/device. I found out about libftdi a bit later so I statically compiled it into the programs.
I did have libusb installed, and you can add it via the feeds script and selecting it via make menuconfig. Here’s the hacky way I configured libftdi…(started doing a ‘package’ but got too lazy)…change paths as appropriate.
openwrttoolchaindir=/home/user/openwrt/staging_dir/toolchain-mipsel_gcc-3.4.6_uClibc-0.9.29/usr/bin

export PATH=$PATH:$openwrttoolchaindir

openwrtstagingdir=/home/user/openwrt/staging_dir/target-mipsel_uClibc-0.9.29/usr

CPPFLAGS="-I$openwrtstagingdir/include" \

LDFLAGS="-static -L$openwrtstagingdir/lib" \

LIBS="-L$openwrtstagingdir/lib -lusb" \

./configure --build=i686-linux --host=mipsel-openwrt-linux-uclibc --prefix=$openwrtstagingdir
Hello Madox!
Thank you for your help, i can compile my program with you help! 🙂
Thank you again!
Zsuzsi
You’re welcome Zsuzsi, thought I’m curious what you’re doing with a FTDI chip on a router 🙂 I’m suspecting its something interesting…care to share with the world?
Hello Madox!
I using the FTDI chip to manage a complate system. The RFLink device what is connecting to router is the master on the bus. I used it with PC to collect data from the bus, and manage it, but now i would like to use it without pc. That is the reason because i would like to use router.
I shared the SDK what i made. You can upload it from here, if you intrested
http://rapidshare.com/files/248027571/OpenWRT_libftdi_SDK.tar.gz.html
I use the static library what you suggest to me.
Zsuzsi
hi
This is a outstanding publish, im delighted I stumbled onto this. Ill be back later to check out other posts that you have on your blog.
Hi, sounds really interresting, I like the idea of using the router as the main unit. Could you post the source code? 🙂 Even if it’s measy or whatever 🙂
A bit delayed reply – but yes I’ll do it today 🙂
I am very new to this but am trying follow your concept of using the ASUS router with the USB Relay. I have the Router loaded with Kamikaze and installed libusb but having trouble following the libftdi stuff. Any info you can provide me would appreciated. My end goal is to turn on/off indivisual realys from the openwrt prompt (telneting into the router). Thanks
Hi Chris,
Did you see my reply to Zsuzsi above?
I’ve actually on-sold my relay board to someone who is doing just that. I wonder if I still have the image/files for it on my computer…
Hi Joachim :-
I’ve uploaded the messy source code.
Hi Chris :-
I’ve also uploaded a WebRelay package, including the ‘bitbang2’ executable I used.
I’ve been tinkering with this denkovi usb relay board for a bit but with my limited knowledge of visul basic I’ve been having difficulty trying to understand the event procedure for operating the relays using the source code obtained from the ftdi website. It appears that the drivers are communicating with the chip but I havn’t been able to operate te relays. I didn’t have any success downloading your source code. Not sure why I can’ unzip them. wondering if you can send me the source code to study. thank you
Hi, do you want me to email it to you?
Keep in mind that my code is purely for Linux and would not work for windows. Did you try the examples Denkovi provided?
The catch is to operate in bitbang mode rather any of the other modes.
I am looking to build a project that needs a 4-channel relay board that can be controlled from a linux PC. I’m having a hard time finding a suitable one, and came across your page in my search.
Can you tell me what relay board you used for this, as well as what software you used to interface with it?
All I need is the low-level part that would enable another script to turn on/off specific relays….
Ok NVM I’m a dummy. The first two times I looked over the site I manage to completely miss the links to both 😉
NP 🙂 These work great using just scripts which is what I used 🙂